
Quick Links
-
Create a distinctive Wallpaper and Screen grab
-
Launcher to sort Apps by Color
-
Folders containing applications that are linked to other Apps
-
Modify the shape and shade of the Cursor
-
Choose Between a Dark or Light Theme
-
Rewire Keyboards to Enhance Productivity
-
Use a GIF as Your Profile Picture
Chromebooks can be personalized with a variety of options, such as shifting the Shelf and wallpaper, changing the cursor’s size, or switching between dark and light modes. Here are a few ways to customize your Chromebook settings, even if you have never done it before
8. Personalize the Shelf
The Shelf, located at the bottom of Chromebooks, is a convenient spot for managing open apps and initiating new ones. It Offers several customization options You can adjust the layout by moving it to the left or right, pin frequently used apps, and delete unnecessary ones. If you don’t want to mess up, you can hide the Shelf and access it by hovering over the bottom
Right-click on the desktop, select “Shelf Position” and move it to a new location. By clicking on the “Autohide Shelf” button, you can make it hide automatically. ”

To pin frequently used apps, right-click on an app and select” Pin to Shelf. ”
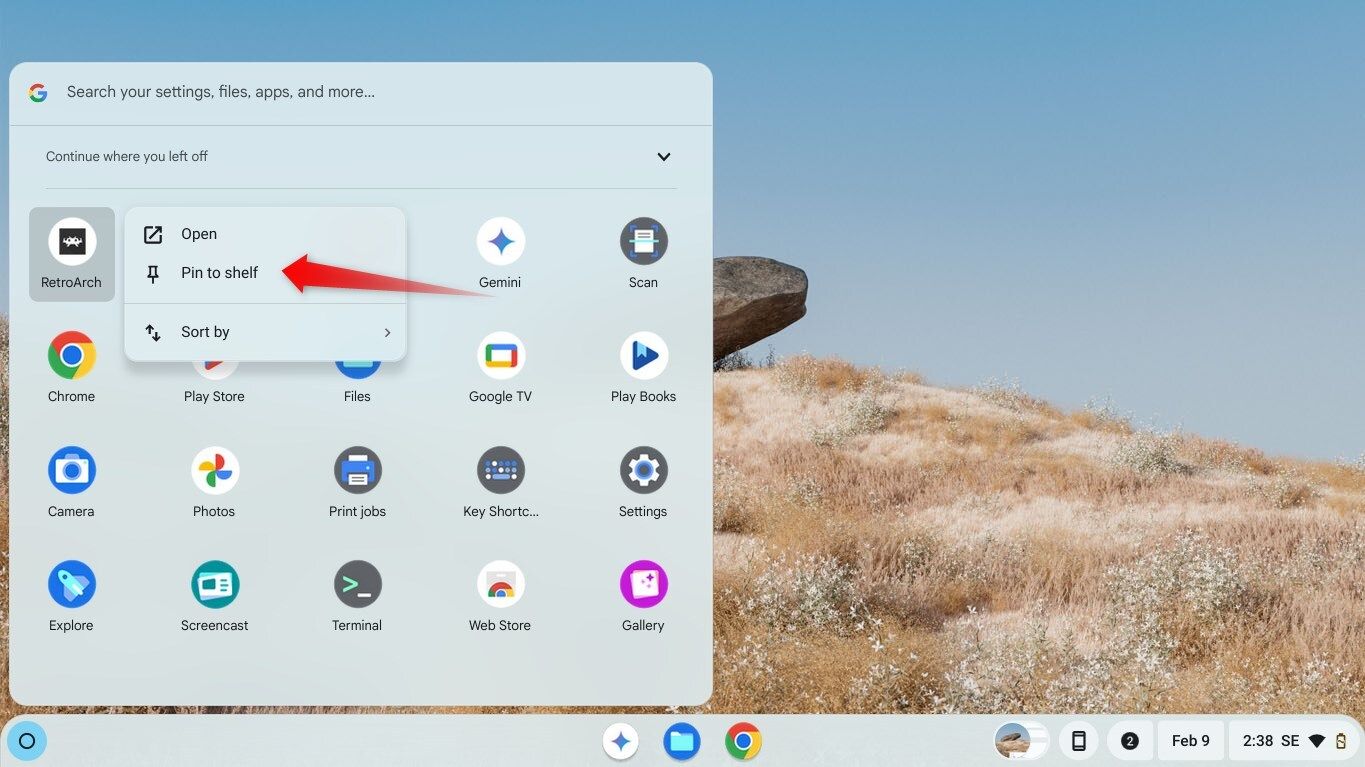
Right-clicking and selecting” Unpin “will remove it. Rearranging pinned apps can be done at any time


Related
Hidden Costs of Chromebook Purchases
7. Create a distinctive Wallpaper and Screen grab
The wallpaper on your Chromebook can be altered to make it appear more personal and appealing. Select the desktop with the right-clicking mouse, choose” Set Wallpaper and Style “and then click” Wallpaper “. You have the option to choose an image from the preset wallpaper collections on your laptop, Google Photos, or Chrome OS
You can also activate” Change Daily “to facilitate your desired behavior The wallpapers on Chromebooks are selected and displayed in a specific order , giving it a fresh look every day

Additionally, you can install a screensaver. Right-click On the desktop, select” Set Wallpaper and Style “and then click On” Turn On “. Following that, choose from the animations available or a Google Photos album

6. Launcher to sort Apps by Color
By clicking on the circle icon in the bottom-left corner, you can quickly access your downloaded apps. The launcher’s random arrangement of apps makes it challenging to find what you need. By arranging them by name or color, you can easily find them and their benefits
Apps are sorted alphabetically by name, with apps starting with” A “being first in the list, followed by” B “and so on. By arranging apps into color groups based on their icon colors, they can keep separate applications from the same developer, such as Google. Firstly, right-click in the launcher and type in” Sort By “followed by” Name “or” Color “to sort apps.”

5. Group Related Apps Into Folders
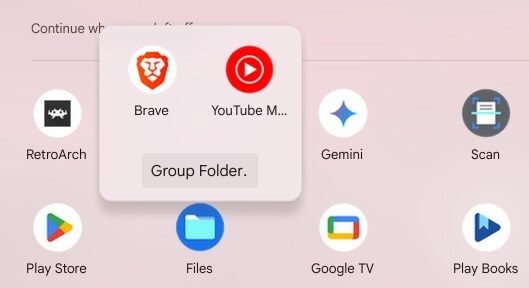
Sorting apps by name or color makes them easier to find, but it may not be enough if you have too many installed. To keep your launcher organized and improve navigation, you can group related apps into folders. For example, you can create separate folders for work apps, games, productivity tools, etc
To create a folder containing a particular type of app, open the launcher, drag one app over another, and release it to form a group. Then, give the folder an unique name. To add more applications to this folder, drag them onto it. To remove an app, open the folder, drag it outside, and release it
4. Adjust the Cursor’s Size and Color
The default mouse cursor is too small, which makes it dull and straining on the eyes. I customize its size and color to make it more noticeable and improve visibility. This is particularly useful for those using a high-resolution display or individuals with vision impairments
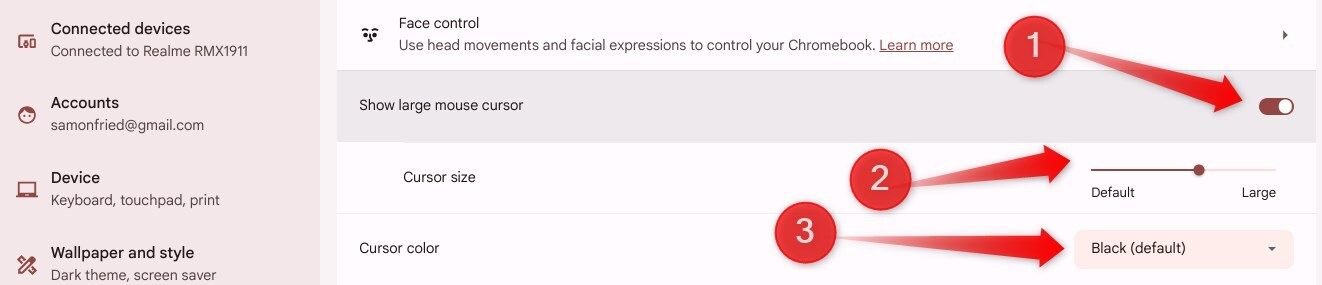
You can customize the mouse cursor in the Accessibility settings Open the launcher, go to “Settings” navigate to the “Accessibility” tab on the left, and open “Cursor and Touchpad.” Here, enable “Show Large Mouse Cursor” then use the slider to adjust its size. You can also open the “Cursor Color” dropdown to change its color from the default option
3. Switch Between Dark or Light Theme
Like most operating systems, ChromeOS allows you to switch between dark and light themes. The light theme is ideal for bright environments, while the dark theme reduces eye strain in low-light settings. Adjusting the theme based on your surroundings can make your display more comfortable and visually appealing
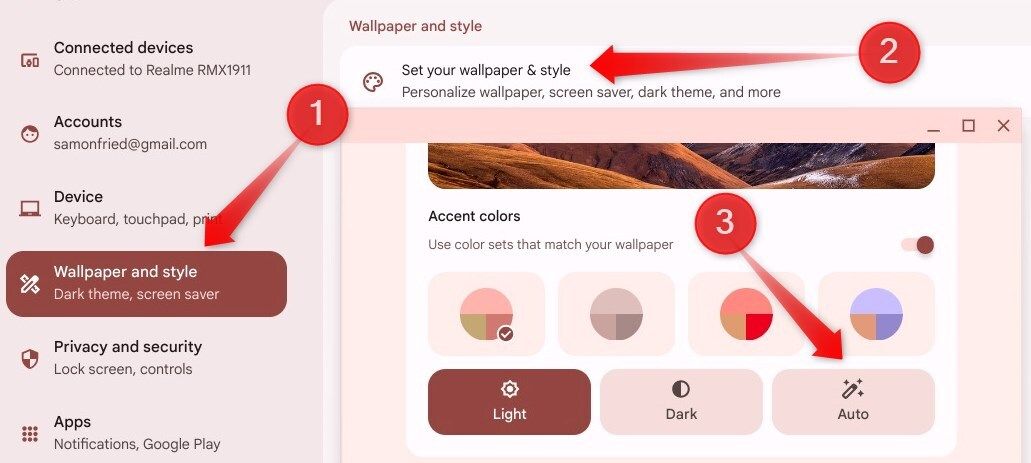
To Change themes on your Chromebook , open the launcher by clicking on the circle icon in the bottom-left corner, go to “Settings” and then navigate to Wallpaper and Style> Set Your Wallpaper and Style. Here, you can select “Dark” or “Light” mode or choose “Auto” to let ChromeOS switch themes automatically based on your location and the time of day
2. Remap Keyboard Keys for Better Productivity
By default, ChromeOS assigns specific keys to functions you might not use frequently. For example, the Search key is typically used to search the web and apps, but you can Remap it to act as a Caps Lock key , similar to Windows laptops. Likewise, you can remap other keys to make it easier to access functions you use often
To remap keys, go to the launcher and open the Settings app. Then, select the “Device” tab and select “Keyboard.” Here, you can use the dropdown menus for Search, Ctrl, Alt, Escape, and Backspace to assign them new functions. You can also use the keys in the top row as function keys by toggling the corresponding option

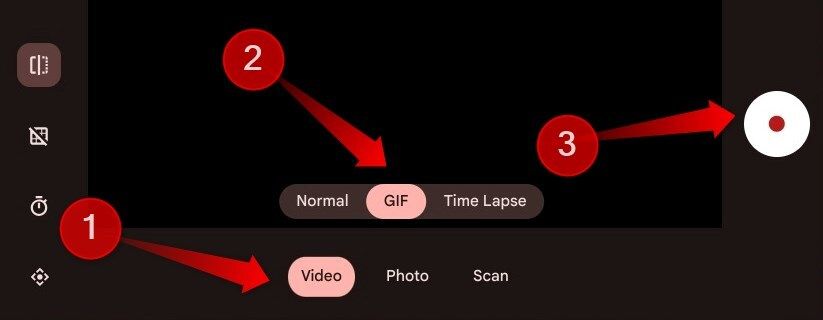
1. Use a GIF for Your Profile Picture
By default, your Chromebook uses the static image from your Google account as your profile picture. If you want to add some personality, you can replace it with an animated GI F. T his feature makes your login screen feel more dynamic and unique. You can either upload a GIF you’ve downloaded or record a short clip to use as one
To set a GIF as your profile picture, open the launcher, go to the “Settings” app, and navigate to the “Accounts” tab. Click on your profile picture and upload the GIF you want to use. To create a custom GIF, open the Camera app, select Video> GIF, record a short clip, and click “Save” when satisfied
Customizing your Chromebook improves its visual appeal, keeps things organized, and improves navigation. Customizing the setup to suit your needs also makes you more efficient. If you haven’t tried the above features, do so and see how much they can improve your Chromebook experience